Joyeux 14 juillet

From May 2003 to July 2005, I spent my life away from the United States living and working with a church in Strasbourg, France. It was an incredible and life-changing experience that left me with a new appreciation of the French language, culture, and people. The one thing I missed a lot when I was in France was celebrating American holidays. Obviously France does not think anything of July 4th. To them it is just another day. But July 14th is a completely different matter. Just 10 days after the United States’ beloved national holiday, France celebrates its own independence from the monarchy. Also known as Bastille Day, July 14th is a huge holiday for the French. It involves fireworks and parades and all kinds of festivities not unlike the ones most of us are accustomed to. And since France’s colors are also red, white and blue, it was easy for me to feel right at home even while celebrating in another land.

This year in honor of le 14 juillet, I decided to make a red, white and blue dessert. These pastries have absolutely no tie to France. I actually got the original recipe (which I tweaked slightly) from Visions of Sugar Plum. The original recipe was for a blueberry pastry with lemon cream cheese icing. But I decided to make half of these strawberry and to leave out the lemon flavor altogether. The results were good. This was my first time working with puff pastry, though, and honestly I expected it to be a lot more convenient than making my own pie dough. While I’m sure it did save me some time to have the pre-made dough, I still had trouble rolling it out and cutting it into uniform squares for the pastries. In the end, I think they turned out alright.

Happy Birthday Daddy!

About a week ago my father hit a milestone. He turned 50 years old. Not one to make a fuss, my dad insisted on a small family breakfast and absolutely no other festivities. We, of course, obliged. However, my mom simply could not stand NOT having a cake. So for Sunday lunch, she requested I make a German Chocolate Cake- his favorite. This cake is not too difficult to make, though it does use a ridiculous number of bowls- 1 for the butter/sugar mixture, 1 for the melted chocolate, 1 for the dry ingredients, 1 for the egg whites and 1 for the egg yolks. That’s 5 bowls for 1 cake recipe! Fortunately the frosting is a 1 pot deal, otherwise, I might have had to pause and do dishes in the midst of cooking. But other than this cake dirtying up every dish in your kitchen, it’s a simple enough recipe to follow. And believe me when I say the results are rewarding.Personally, I’m not too big on either cake or chocolate, so you can imagine where I stand on German Chocolate Cake. That being said, I did enjoy the reactions of my taste-testers, and based solely on that, I’m calling this recipe a hit. Honestly, I just google “Bakers German Chocolate Cake recipe” and pick the first one that pops up. You could probably find the instructions printed on the back of the Bakers German Chocolate bar too.

Embracing My Inner Child

In general, I have always considered myself to be somewhat of an “old soul.” As a child I preferred conversing with adults to playing with toys, I’m usually more serious than I am silly, and I’m typically the person my friends turn to when they need practical solutions and advice. The one glaring exception to this tendency toward boring responsibility is that I LOVE, and I do mean LOVE, sprinkles. On everything. I can’t control myself. It’s actually quite ridiculous. I mean, it’s not socially acceptable for a grown women to elbow out a small child for a pink frosted, sprinkle-encrusted doughnut. I know if I DO eat a breakfast pastry, it should probably have a more sophisticated flavor profile than just sugar, sugar and more multi-colored sugar. Even so, every time I see a mother get a sprinkle doughnut for her kid, I secretly covet the sweet confection in the five year olds’ hands. The same goes for ice cream, cake, even cookies- Sprinkles always make things better. Other countries totally get this. In Australia and New Zealand (and I’ve seen it done in France as well) kids get to eat buttered bread with sprinkles on top and they call it fairy bread! Since I’m pretty sure fairies are exactly 1000 times more awesome than any other imaginary thing I could ever want to be, this automatically makes sprinkles the official best dessert decoration on the planet. Fact.

But I digress….

The point of my gush-fest on sprinkles is to explain why my feat yesterday was such a triumph. You see, yesterday I made homemade, from-scratch Confetti Cake! I’ve wanted to try my hand at homemade Confetti Cake for quite a while, but I never got around to it. I love Confetti Cake, but since it actually traces its orgins to a boxed mix, most people have never had one from scratch. Well people, I am here to tell you to think outside the box and make this cake!

The recipe is simple. I got it from iheartcuppycakes.com, so you can follow the link to check it out.

The secret, in my opinion, is the type of sprinkles you buy. I got round ones (I also used them to decorate the top of the cake, if you need a reference.) They produce the most consistent color splotches in the cake once it’s baked. Otherwise, the rest is simple and SUPER delicious!

I’m back

Two years after my last post, I have decided to return to the land of food blogging. Since Iron Cupcake is no longer a challenge in which I can participate, I am going to use this space as a forum for my personal baking endeavors. I know it won’t be quite as interesting as my bizarre cupcake creations, but hopefully it will turn into something I can enjoy and express my creativity through nonetheless.

Today I made a Mango Blackberry Cobbler from Baking Bites. You can find the recipe here. Mangoes are one of my dad’s favorite fruits, so I decided to give this concoction a go. Unfortunately I didn’t get any pictures of the finished product, nor did I snap any of the homemade poptarts I created on Thursday. I think it will take some time for me to get used to food photography again!

At any rate, I just wanted to officially say I’m here again. Hi!

Iron Cupcake 010: Savory

When people think about cupcakes, the word “savory” doesn’t usually come to mind. However, anyone who frequents cupcake blogs has seen a recent trend of adding savory elements to these normally coma-inducingly-sweet concoctions. Bacon is the most common addition. And, though I did manage to stay true to my vegetarian roots, my cupcake this month gives a nod to the unusual ingredient.

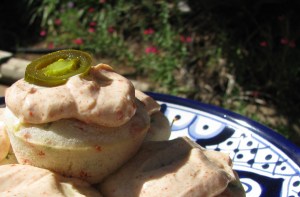
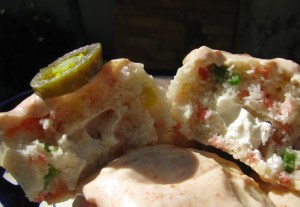
While I vacillated between several different options for my entry this month, in the end I decided to make a Jalapeno Popper Cupcake complete with zesty Southwestern Ranch frosting.

The cake is a base of cornbread with jalapenos and fake bacon bits sprinkled throughout. A cream cheese center completes the “popper” tribute. Atop the cake is a dollop of  Southwestern Ranch sour cream dip. A true Tex-Mex delight!003

007Here are the awesome prizes I get if I win! Click on the link in my sidebar to vote anytime after May 30th.
Last and certainly not least, don’t forget our corporate prize providers: HEAD CHEFS by FIESTA PRODUCTS, http://www.fiestaproducts.com, HELLO CUPCAKE by Karen Tack and Alan Richardson, http://blog.hellocupcakebook.com, JESSIE STEELE APRONS http://www.jessiesteele.com; TASTE OF HOME books, http://www.tasteofhome.com; a t-shirt from UPWITHCUPCAKES.COM http://www.upwithcupcakes.com/. Iron Cupcake:Earth is sponsored in part by 1-800-Flowers, http://www.1800flowers.com .

Iron Cupcake 008- Soda Pop


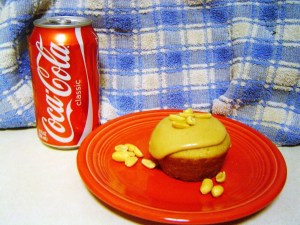
dsc042101This month’s Iron Cupcake Challenge theme was Soda Pop. I had lots of different ideas for possible concoctions. In the end, though, I went with a tribute to a classic American combo- Peanuts and Coke. I know not everyone has heard of the once-popular pasttime of poking roasted, salty peanuts in a cold glass bottle of Coca-Cola. To those of you that fall in that category, I say: http://www.chow.com/general_topics_digest/1749.

The recipes I used were completely my own creations. The cake was heavily adapted from an old Fannie Farmer cookbook- with me substituting coca-cola for the milk and throwing in a handful of roasted peanuts before baking.

The frosting was also adapted from a “Quick Caramel” frosting in the aforementioned book. But I subbed peanut butter for the butter and added a good dose of coke for flavoring.

So, now to the part everyone cares about. Taste:

I’ll be honest. The frosting totally makes these cupcakes. Don’t get me wrong. The cake is very good. Fluffy without being too airy, sweet but not sickening, this cake recipe could very well turn into a go-to basic for me. But I couldn’t taste the coke so much, and the peanuts developed a chewy texture that I didn’t love. Not sure how to fix that in the future….

The frosting, however, was divine. It was a perfect marriage between peanuts and coke with neither flavor overpowering the other. And, considering that I contrived this recipe on my own, I’m very surprised at HOW successful my experiment was.

Here are the recipes if anyone is interested:

Coke Cupcakes:

½ cup butter softened 

1 ¼ cup brown sugar

2 tsp vanilla

2 eggs

2 cups flour

3 tsp baking powder

½ tsp salt

1 cup coke

½ cup roasted peanuts

1.       In a large bowl, cream butter with brown sugar.

2.       Add vanilla and eggs and beat until creamy.

3.       In a separate bowl, combine flour, baking powder and salt.

4.       Add dry ingredients to wet and mix until smooth.

5.       Mix coke to batter. Fold in peanuts.

6.       Bake in a 325 degree oven for 15 minutes.

I got 15 cupcakes out of this.

Carmel Peanut Butter and Coke icing:

½ cup creamy peanut butter

½ cup brown sugar

½ cup coke

2 to 3 cups powdered sugar

In a medium pan on medium-low heat, melt peanut butter and brown sugar til liquidy. Pour in coke and stir to combine. Allow mixture to cool. Incorporate powdered sugar to desired consistency. (I had trouble getting mine to set. You could use less coke, but then that flavor would be lost. More sugar, a few tablespoons of flour or just cooling in the fridge could help.)

So there you have it, folks. My entry for Iron Cupcake Earth: Soda. Here’s the stuff I could get if you vote for me and I win. Pretty cool.

Our April ETSY PRIZE-PACK is from artists:

Last and certainly not least, don’t forget our corporate prize providers: HEAD CHEFS by FIESTA PRODUCTS, http://www.fiestaproducts.com, HELLO CUPCAKE by Karen Tack and Alan Richardson, http://blog.hellocupcakebook.com, JESSIE STEELE APRONS http://www.jessiesteele.com; TASTE OF HOME books, http://www.tasteofhome.com; a t-shirt from UPWITHCUPCAKES.COM http://www.upwithcupcakes.com/. Iron Cupcake:Earth is sponsored in part by 1-800-Flowers, http://www.1800flowers.com .


Boring Sundays Make for Good Granola!

So I’ve been wanting to try to make my own granola for a while now. But I’m pretty picky about what I do and do NOT like in commercially-packaged cereals, so I’ve always been worried that my homemade concoction would fail to impress. Plus, every time I’ve googled “granola”, the magnitude and variety of recipes has made it impossible for me to choose.

This recipe is not from the internet. It’s actually modified from my old college roommate’s family’s recipe. And while I’m not yet satisfied with these results, I think this recipe has proved to be a good jumping-off point. I’d say this basic recipe is a middle-of-the-road cereal in the oil and sugar departments. It didn’t clump like I’d hoped, but the overall flavor was nice.

I’d really like to try some flavor variations in the future, as well as some other recipes that use alternative sweeteners (like apple juice) and less oil. (I’ve even seen some with peanut butter….hmmm….This could be love!)


So here you have it- my almond, date, coconut and seasame granola! I got about 6 cups out of this. We’ll see how long it lasts!

Almond, Date, Coconut, Sesame Granola

3/4 cup sliced almonds

1/2 cup wheat germ

1/4 cup sesame seeds

1/2 cup dried coconut

3 cups rolled oats

1/2 cup honey

1/4 cup oil

1 tsp cinnamon

1 tsp vanilla extract

1/2 tsp salt

3/4 cup chopped dates

Preheat oven to 320

Mix dry ingredients together. In a separate bowl, mix honey, oil, vanilla, cinnamon and salt. Pour over oat mixture. Spread onto a cookie sheet in a thin layer. Bake a total of 20 to 30 minutes, stirring every 5 to 7 minutes, and being careful not to let it burn. Let cool. Break up the chunks and mix in dried fruit. Store in an airtight container. (I keep mine in the freezer.)

Iron Cupcake 008- Nuts and Seeds

This is my very first post- and the actual impetus for this blog. I started onetuffcreampuff as a way to participate in Iron Cupcake Earth- a cupcake baking challenge in which a specific ingredient or theme is announced at the beginning of every month. Participants have just 4 weeks to devise a cupcake that they think best embodies said theme. This month’s challenge is Nuts and Seeds. For my entry I have created a Baklava-inspired cupcake. The cake itself is a light and fluffy honey walnut, complete with chopped nuts as well as homemade nut butter swirled inside. Because each Baklava recipe differs in the spices it uses, I kept things simple with some cinnamon and just a teensy bit of nutmeg.  The frosting, reminiscent of the traditional syrup that is poured over Baklava, is a honey and rosewater cream cheese frosting. Topped off with a dusting of cinnamon sugar and a decorative walnut half, this cupcake was quite a hit with my taste-testors. While I know there is some room for improvement, I’d say that this was not a bad first attempt at Iron Cupcake Earth, and I’m looking forward to even more exciting challenges in the months to come! Okay, now it’s recipe time:

Baklava Cupcakes

baklava cupcake

Makes about 16 cupcakes

  • 2 1/2 C all-purpose flour
  • 3 t baking powder
  • 1/2 t salt
  • 1 ½ tsp cinnamon
  • A pinch of nutmeg
  • 1/3 C unsalted butter, softened
  • 1/2 C sugar
  • 1/2 C honey
  • 1 egg
  • 2 T walnut butter
  • 1 C buttermilk
  • 1 t vanilla extract
  • 1/2 c walnuts


  1. Preheat the oven to 375 degrees F.
  2. Sift together flour, baking powder, salt and spices in a medium-sized bowl.
  3. In another bowl, cream together butter, sugar, and honey until smooth, about 3 minutes. *This bowl will be your main batter bowl, so make sure it’s big enough!*
  4. In a small bowl, whisk together buttermilk and vanilla.
  5. With the mixer running, add the egg to the butter-sugar mixture, until well-blended.
  6. Continue beating in the walnut butter
  7. Alternately blend in the flour mixture and buttermilk to the butter mixture until everything is combined.
  8. Mix the walnut pieces in with a spoon, just until mixed throughout.
  9. Fill cupcake liners almost to the top. These cupcakes do not rise very much.
  10. Bake for about 20 minutes, or until the top of the cakes are golden and springy.

Honey Frosting
MAKES 2 CUPS

1/2 cup (1 stick) unsalted butter, softened
One(8-ounce) package cream cheese, softened
1/4 cup honey

2 T rosewater

1. In a medium bowl, whisk all ingredients until smooth.

Aaaand, here’s the contest information:


Our March ETSY PRIZE-PACK is from artists:

Last and certainly not least, don’t forget our corporate prize providers: HEAD CHEFS by FIESTA PRODUCTS, http://www.fiestaproducts.com, HELLO CUPCAKE by Karen Tack and Alan Richardson, http://blog.hellocupcakebook.com, JESSIE STEELE APRONS http://www.jessiesteele.com; TASTE OF HOME books, http://www.tasteofhome.com; a t-shirt from UPWITHCUPCAKES.COM http://www.upwithcupcakes.com/. Iron Cupcake:Earth is sponsored in part by 1-800-Flowers, http://www.1800flowers.com . And as a special thank you, we would like to once again thank DIANAEVANS – http://www.etsy.com/shop.php?user_id=5599270 for her participation in the February challenge. An incorrect link was posted and we want to be sure that she gets the recognition she deserves. Thanks again Diana!